Introduction
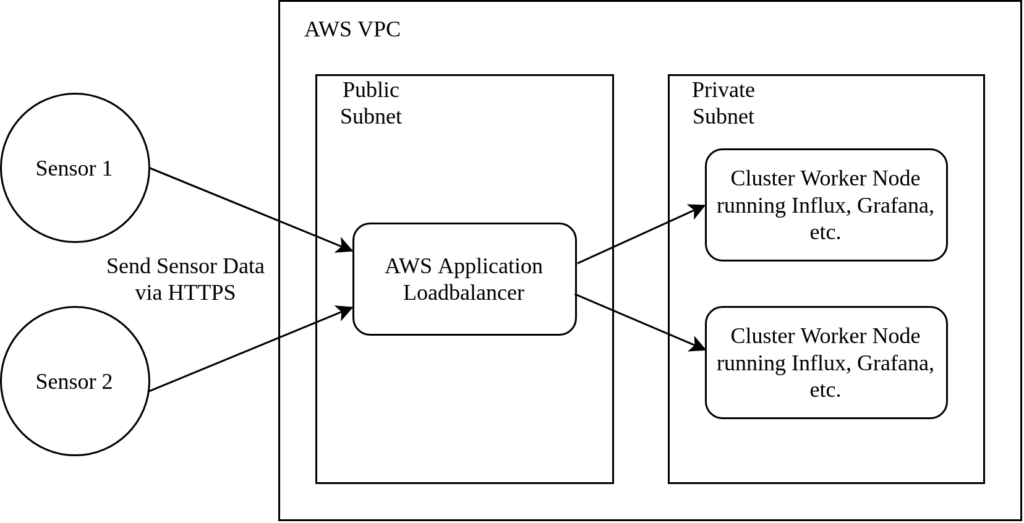
In our previous article we started building a kubernetes cluster in AWS to run InfluxDB and Grafana. We were aiming towards the following architecture:

ESP32 based sensors are transmitting their humidity and temperature values via HTTPS to an AWS application loadbalancer. The ALB forwards the traffic to a private subnet which contains the k8s InfluxDB pod. Furthermore, a Grafana pod is attached to the InfluxDB and also reachable via the application loadbalancer.
In the previous article, we created the EKS cluster with terraform. However, the following topics were not covered and will be part of this article:
- Spawn an application load balancer.
- Deploy InfluxDB and Grafana services to the cluster.
- Attach persistent storage to both services.
- Attach a SSL certificate to allow HTTPS traffic.
Source Code
The projects source code is available here on Github. It contains scripts and documentation to spin up a cluster in AWS. Furthermore, the repository provides kubernetes yaml files to deploy the applications, load balancer and persistent storage in the cluster.
LoadBalancer
The application loadbalancer runs in a public subnet and is internet facing. It listens to two URLS:
- influxdb.your-domain.com: Forward sensor HTTPS traffic to the influxdb pod.
- grafana.your-domain.com: Forward browser HTTPS traffic the grafana dashboards.
The advantage of this architecture is: The kubernetes pods are in a private subnet. The single internet facing component is the ALB which is managed by AWS. This way, it becomes more difficult for malicious users to attack our infrastructure.
You can create an application loadbalancer in the AWS CLI and manually configure it in a way to forward traffic to the corresponding worker nodes. A more elegant way is the “Loadbalancer Controller” which is implemented as a k8s component. You have to perform two steps to add it to a project:
- Install the loadbalancer controller into the cluster.
- Configure the controller by creating a k8s “Ingress” component.
Unfortunately, there is no quick and easy way installing a application loadbalancer controller into a cluster. Therefore, we recommend to stick to the official AWS guides:
- Application load balancing on Amazon EKS for a general introduction and the prerequisites
- Installing the AWS Load Balancer Controller add-on to install the controller into the cluster.
In case of problems, read the controllers logs via kubectl logs -n kube-system deployment.apps/aws-load-balancer-controller. Usually, it gives good hints what went wrong.
After a successful installation, the following “Ingress” is applied to the cluster:
apiVersion: networking.k8s.io/v1
kind: Ingress
metadata:
  name: influxdb-ingress
  annotations:
    alb.ingress.kubernetes.io/scheme: internet-facing
    alb.ingress.kubernetes.io/target-type: ip
    alb.ingress.kubernetes.io/subnets: phobosys-2-eks-stack-PublicSubnet01, phobosys-2-eks-stack-PublicSubnet02, phobosys-2-eks-stack-PrivateSubnet01
    alb.ingress.kubernetes.io/backend-protocol: HTTP
    alb.ingress.kubernetes.io/certificate-arn: arn:aws:acm:eu-central-1:your-certificate-here, arn:aws:acm:eu-central-1:your-second-certificate-here
    alb.ingress.kubernetes.io/listen-ports: '[{"HTTPS": 443}]'
    alb.ingress.kubernetes.io/group.name: iot-example
spec:
  ingressClassName: alb
  rules:
  - host: grafana.your-domain.com
    http:
      paths:
      - path: /
        pathType: Prefix
        backend:
          service:
            name: grafana-service
            port:
              number: 3000
  - host: influxdb.your-domain.com
    http:
      paths:
      - path: /
        pathType: Prefix
        backend:
          service:
            name: influxdb-service
            port:
              number: 8086
It consists of a few general configuration options and a rule set. In our case, we have to
- Provide a list of subnets in which the ALB resides
- A reference to an AWS SSL certificates since we want to use HTTPS
Afterwards, we describe the ALB rule set:
- The host name should match your previously added SSL certificates
- Service is a reference to the kubernetes service which is created in the following InfluxDB and Grafana sections
Finally, AWS will create the loadbalancer for us and send traffic to the corresponding k8s nodes / services.
Persistency
InfluxDB and Grafana need external storage. Otherwise, their data is lost when pods or nodes are replaced. First, we have to install an “Elastic Block Storage Driver” into the kubernetes cluster. When installing the driver for the first time, we have to make sure it has proper permissions to access the AWS cloud:
- Create a dedicated user:
aws iam create-user --user-name ebs-csi-user - Generate access key credentials (make sure not to forget the secret access key):
aws iam create-access-key --user-name ebs-csi-user - Attach a managed policy to this user to provide EBS access:
aws iam attach-user-policy --user-name ebs-csi-user --policy-arn arn:aws:iam::aws:policy/service-role AmazonEBSCSIDriverPolicy
Finally, we create a kubernetes secret which will be used by the EBS driver:
kubectl create secret generic aws-secret \
    --namespace kube-system \
    --from-literal "key_id=${USER_ACCESS_KEY_ID}" \
    --from-literal "access_key=${USER_SECRET_ACCESS_KEY}"
Now the EBS driver is up and running. We define a storage class and start creating storage claims in the usal kubernetes way:
apiVersion: storage.k8s.io/v1
kind: StorageClass
metadata:
  name: ebs-sc
provisioner: kubernetes.io/aws-ebs
parameters:
  type: gp2
reclaimPolicy: Retain
volumeBindingMode: WaitForFirstConsumer

---

apiVersion: v1
kind: PersistentVolumeClaim
metadata:
  name: influxdb-ebs-claim-config
spec:
  accessModes:
    - ReadWriteOnce
  storageClassName: ebs-sc
  resources:
    requests:
      storage: 100Mi
InfluxDB
InfluxDB consists of two components: A StatefulSet and a Service. The complete definition can be found here. The most important snippets are:
    spec:
      volumes:
      - name: persistent-storage-config
        persistentVolumeClaim:
          claimName: influxdb-ebs-claim-config
      - name: persistent-storage-data
        persistentVolumeClaim:
          claimName: influxdb-ebs-claim-data
In the description above, we reference the previously created (EBS) volume claims. The next example contains the Service:
apiVersion: v1
kind: Service
metadata:
  name: influxdb-service
spec:
  ports:
    - port: 8086
      targetPort: 8086
      protocol: TCP
  type: NodePort
  selector:
    app: influxdb
In the service definition, we have to make sure that its name influxdb-service matches the rule name in the application loadbalancer.
Grafana
The full Grafana example can be found here. Again, it consists of a StatefulSet and a Service. The important aspects were already covered in the InfluxDB section: We have to make sure to reference the loadbalancer service name and the volume claims.